Art Talk, Guild News
The Making of a Crochet Easter Bunny
I met Rachel, the owner of Rachel’s Cosy Corner a few years ago. As an avid lover of all things crochet, I spotted her work on Pinterest and fell in love. Since then, I have collected her work and after getting in touch directly, I am honoured to call her a treasured member of the Silk Purse Guild and as well as a close personal friend. Join me as she walks us through the making of her Fabulous Crochet Easter Bunny, which is a treasured piece in my own collection.
Crochet Easter Bunny begins with a Noggin
First things first, get some Yarn/Wool that you like, that would be good for a rabbit. (colour, texture etc. Not good for a rabbit, as in good to eat.) I used Alize for this one and a 2mm hook as the wool is fine and I also didn’t want a holey rabbit. I like my stiches all nice and compact. If you want a larger end product then use bulkier wool and a corresponding hook.
This is the start of the head, believe it or not, I guess at this stage it could be anything, so you will have to take my word for it. 😊
The black thread isn’t part of the design, but how I mark the beginning of my rounds, some use stitch markers I use cotton thread. I find that when I make a mistake, after I have pulled/frogged the wool back I can still work out what row I am on this way.
Let’s start working on the Ears
Tada just like that you have a finished head, with ears.
To get the shape of the head you have to do a bit of sculpting, (don’t worry the book will explain it all.) I could do some sculpting on myself after this lockdown, my stuffing is Kinda doing its own thing. If only it was that easy to pull things into shape. I wish.
I use Safety eyes which I attach before stuffing, you can embroider eyes if you liked, which I think is what the pattern says.
The ears are two separate pieces that you have to sew together, placement is shown in the above picture. When that is done you simply place them on the rabbit head with pins and sew them into position, again the pattern says exactly where to position them, but with everything this in the end is entirely your decision.
Putting it all Together
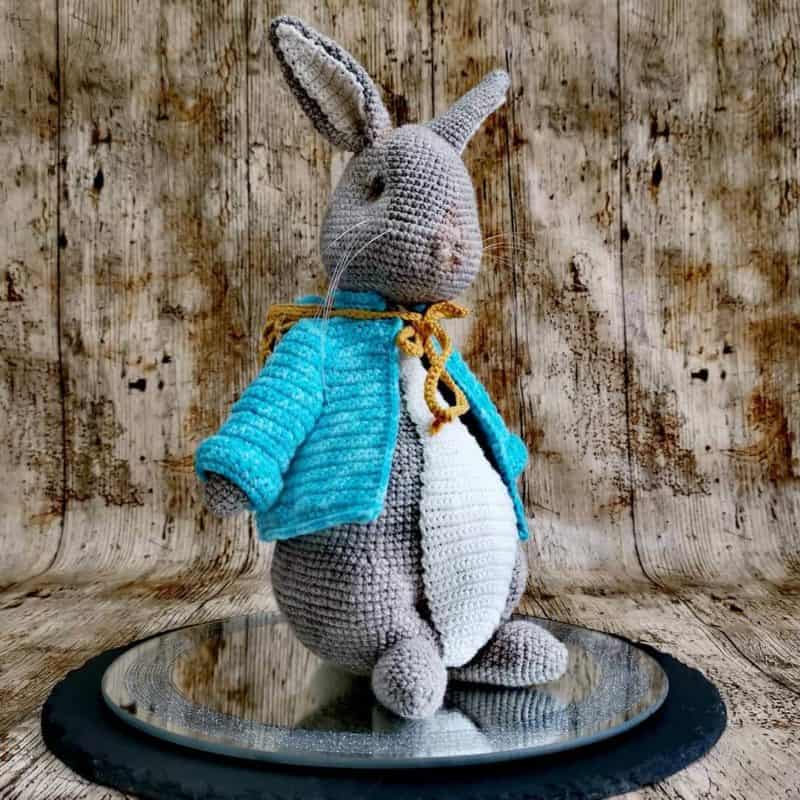
Almost at the finish line, missing some arms and his tail, oh and a Jacket and rucksack of course, which is add a super special finishing touch to our Crochet Easter Bunny. The extra touches are optional… well the rucksack is, not sure about the arms, poor bunny.
I have been trying to think of how long these take me to make, but because I crochet in between normal daily activities, and family life I couldn’t say really. , plus when I don’t pay attention to what I am doing and have to pull down what I have done. 🙄
Maybe I should make another and time the amount of time spend actually on making this cutie of a rabbit.
Little Extra Touches
And talking of rucksacks… A gorgeous golden one for this rabbit is in order to hold his many crochet eggs. Just to add a finishing touch. I have made a rabbit before with a tutu to make it a little different.
Your imagination is your only limit.
The Finished Result
And ta-da. Here is the finished project a cutie of a Crochet Eater Bunny with his very own jacket to keep him warm and rucksack which is filled with crochet Easter eggs. (after all he may get hungry)You could of course put whatever you would like in that little rucksack, sweets or a gift card even. I added some twitchy whiskers using transparent fishing line.
Please remember because of the play value of this item that if you decide to make one to sell yourself, please make sure you conform to all UKCA standards and testing. Or permanently add him to a display stand and sell him as a collector’s item. This crochet Easter Bunny is sure to delight, and makes a fabulous gift for that someone special.


Awww, Sara, that is so lovely. I can honestly say hand on heart that I wouldn’t have a website or be doing anything that I am currently doing today without your invaluable help and constant encouragement. I have an amazing selling platform, awesome website, I am registered as self-employed, new branding…. there is no end to your talents and helpfulness and generosity and the best of it all I am so glad that we had that very first telephone conversation. I am so happy and blessed to be able to call you my friend.. luvs ya buttercup..xx